
In my opinion, one of the reasons why WordPress has captured such a huge share of the market is the easy learning curve that welcomes everyone. so if you are a complete novice or a seasoned dev, chances are that you will have a WordPress powered website up and running within hours.
One of the best things about WordPress development is the fact that you can set up your dev environment anywhere you like and really focus on writing WordPress hooks rather than fiddling with the environment variables. In this regard, your options range from installing it on your local system to a fully managed cloud server.
In this post, I will describe how you can install WordPress locally and set up a fully functional dev environment that supports you whether you are building your first WordPress website or need to punch out a quick demo for a client.
Why Do You Need to Install WordPress Locally?
The entry barrier to using WordPress is very low because it is an open-source platform everyone can freely use it for their projects. Now as I mentioned earlier, WordPress is supported by almost every hosting solution you can think of – from a shared server to fully managed WordPress hosting solutions (such as Cloudways where you can launch a full-fledged WordPress site in just a few clicks) you can pick a solution that fits your budget and expertise.
Managed WordPress Hosting Starting From $0.99/Month
Launch a full-fledged WordPress site in under 10 minutes. Easy scaling. Unmatched Performance & Uptime.
But today, I am only going to discuss WordPress installation locally on your computer. Here are three main reasons why you should have a local WordPress dev environment
Learning and Development
If you are just starting out with local WordPress development and want to polish your skills as a WordPress developer, the offline platform is an ideal option. The best part – there is no cost involved and you can learn WordPress dev at your own pace.
However, you can always hire a WordPress developer to get professional help on the go and save your time.
Here are the link
Test New Features
Testing new features on a live site is not a good idea as things can break and affect your business processes. By installing WordPress locally, you have a safe location to test out new features, themes, and plugins.
An Isolated Dev Environment
Local WordPress setup provides an isolated development environment with zero risk and maximum flexibility for experimenting with new tools and techniques. In many cases, you need an environment to test ideas and play around with code. Once you have a prototype ready, you can move it to a test site for QA and improvements.
How to Install WordPress On Localhost?
Installing WordPress on localhost is very straightforward.
The important thing to remember is that WordPress itself does not run directly on your local machine. It requires a web server, PHP, and a database (MySQL is a popular choice) for proper operations. The combination of these components creates the environment in which WordPress operates.
Typically, the process of building a WordPress environment consists of the following steps:
- Setup the environment
- Download a stable WordPress version
- Install WordPress on the localhost
Install WordPress on Windows
This section covers the WordPress installation on Windows operating system. The following steps demonstrate how to set up and configure a virtual host on Windows 10 using XAMPP.
Step 1: Download XAMPP and WordPress
Before downloading WordPress, it is important to set up the proper environment it runs in. On Windows, this is accomplished by installing XAMPP or WAMP to set up a server – database stack (the industry-favorites are Apache as a web server and MySQL as the database).
In this guide, I will be using XAMPP, downloadable from the Apache website.
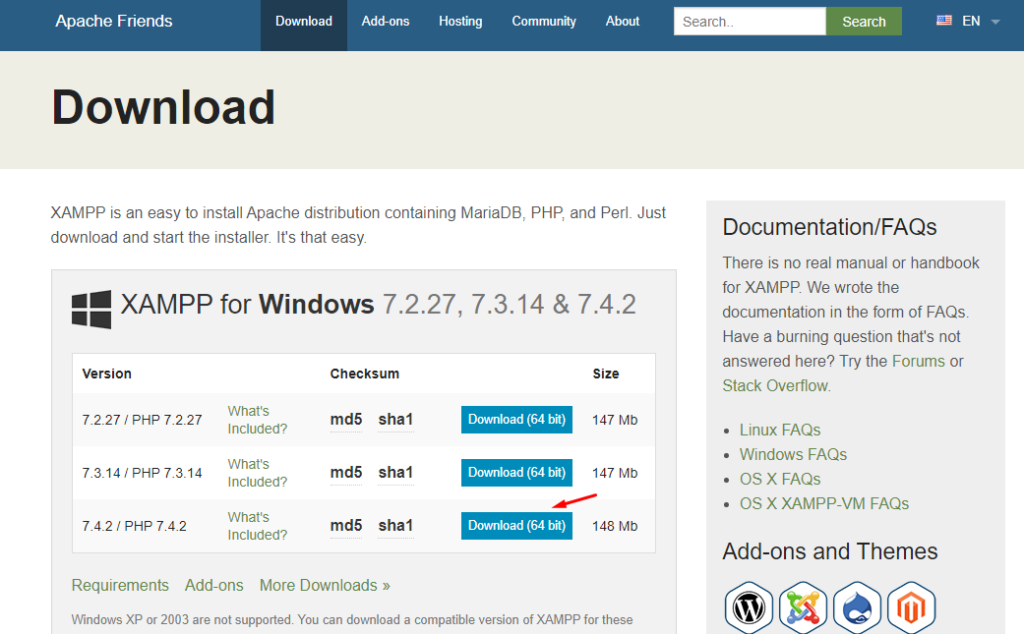
You will see various options that work with different PHP versions. I selected the options that work best with the latest PHP version.
Once the download finishes, run it to install XAMPP on your local system. After installation, launch the control panel to view and set the status for Apache, and MySQL.
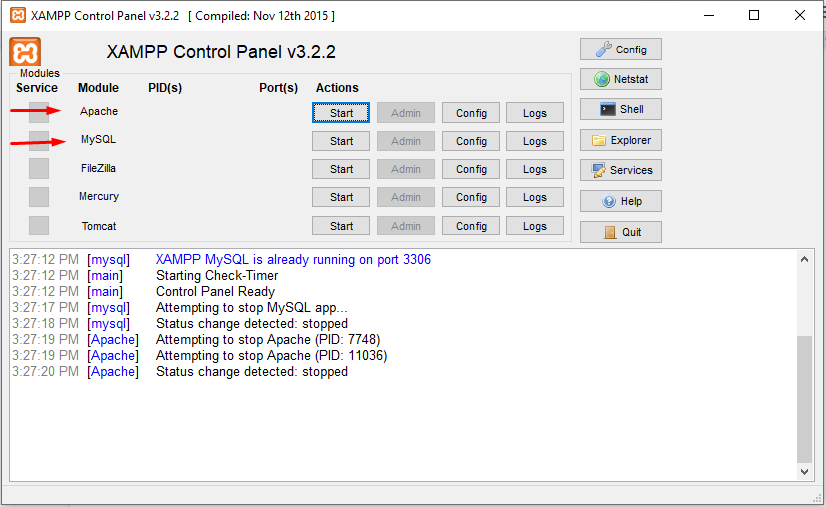
Starting these two services is necessary for installing WordPress locally.
Step2: Install and Setup WordPress Locally
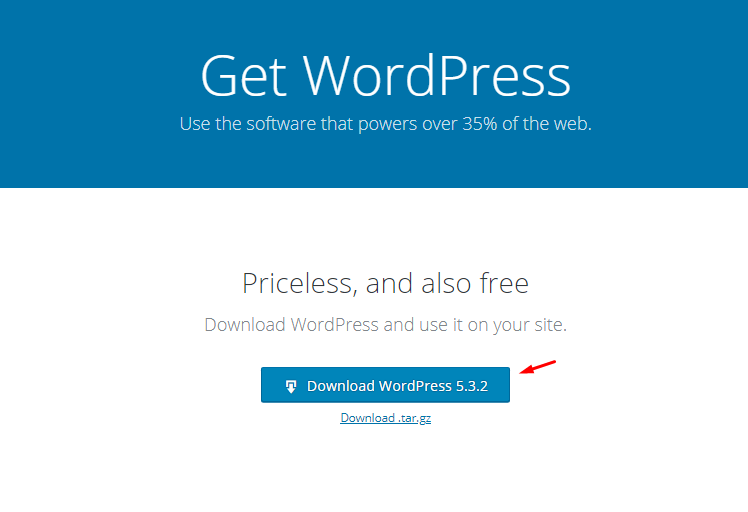
After setting up the webserver and database, download WordPress setup from the official website.
Move the zip file to the /htdocs folder in the XAMPP directory. Unzip the file and navigate to the project directory.
IMPORTANT: Make sure Apache and MySQL services in the XAMPP control panel are up and running.
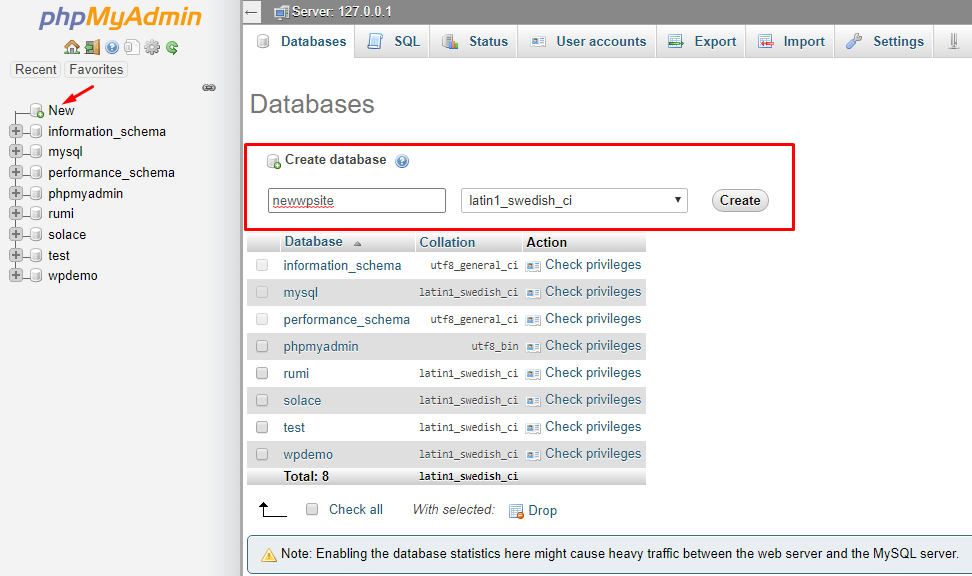
Next, visit the phpMyAdmin portal to create the database of your new WordPress site. You will most likely find the portal on the following URL (depending on your port configuration).
- http://localhost:80/phpmyadmin/
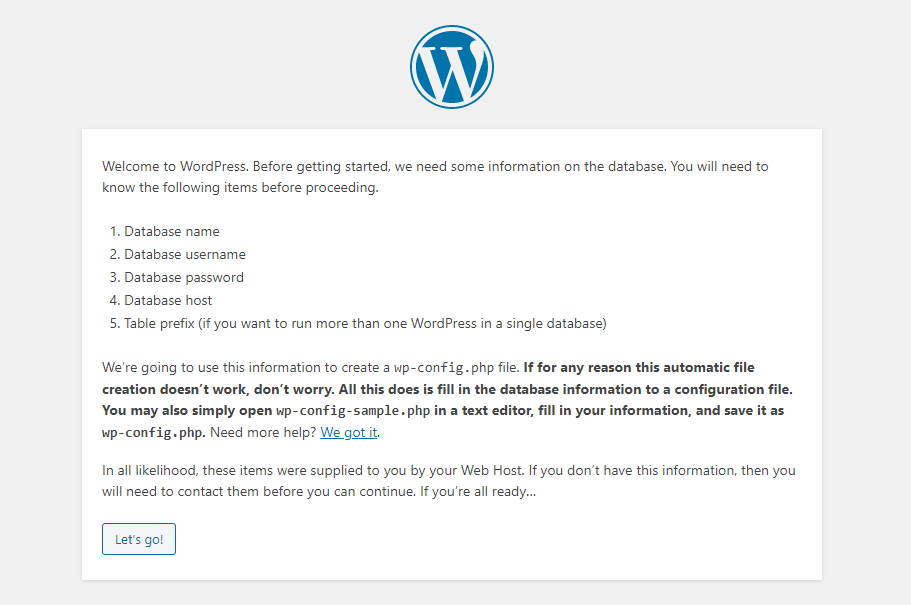
Once the database is created, launch the WordPress installation setup by visiting the following URL.
- http://localhost:80/sites/wp-admin/setup-config.php
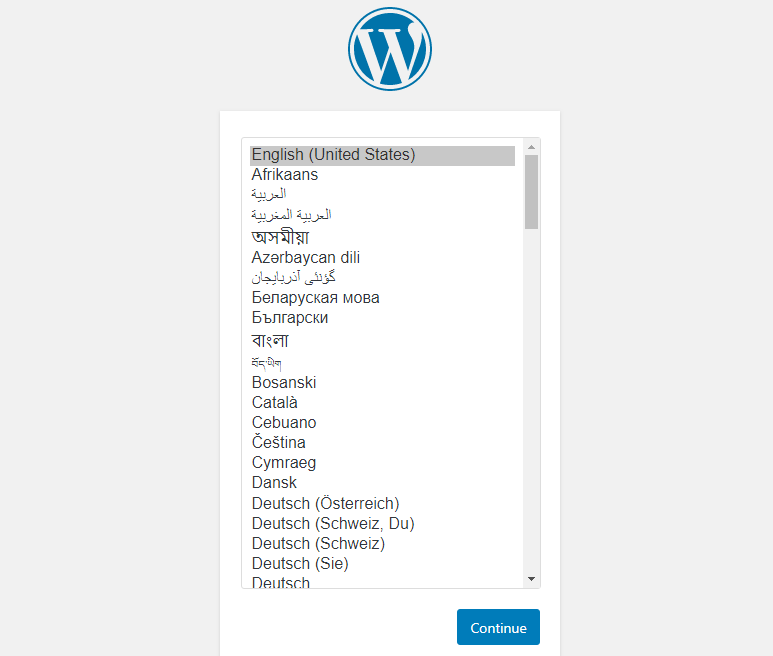
Select the desired language and click ‘Continue’.
On the next screen, follow the steps to add database credentials to the wp-config.php file.
Open wp-config.php file within your favorite code editor and define database credentials as follow:
// ** MySQL settings - You can get this info from your web host ** //
/** The name of the database for WordPress */
define( 'DB_NAME', 'newwpsite' );

/** MySQL database username */
define( 'DB_USER', 'root' );

/** MySQL database password */
define( 'DB_PASSWORD', '' );
Save the file and head back to WordPress installation wizard.
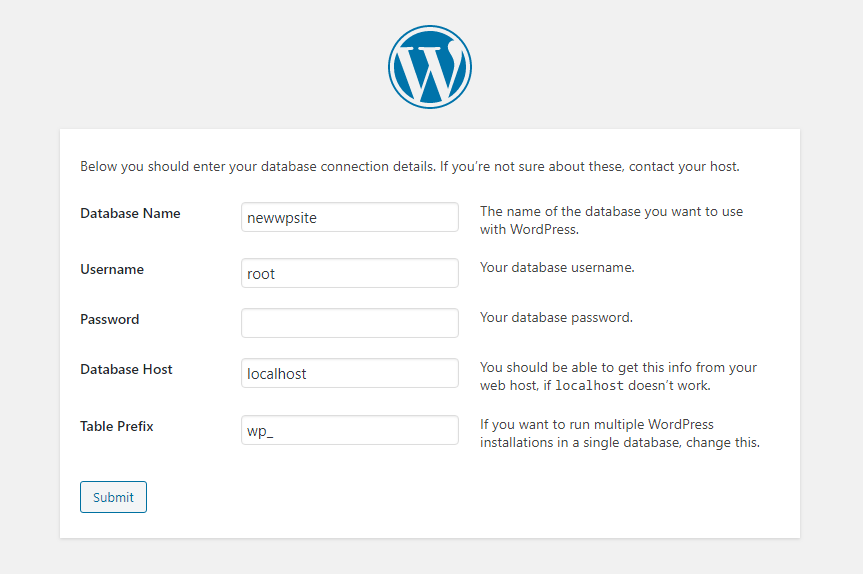
Enter the database name, username, and password. You may also define your own table prefix but for now, I am keeping the default value. When finished, click ‘Submit’.
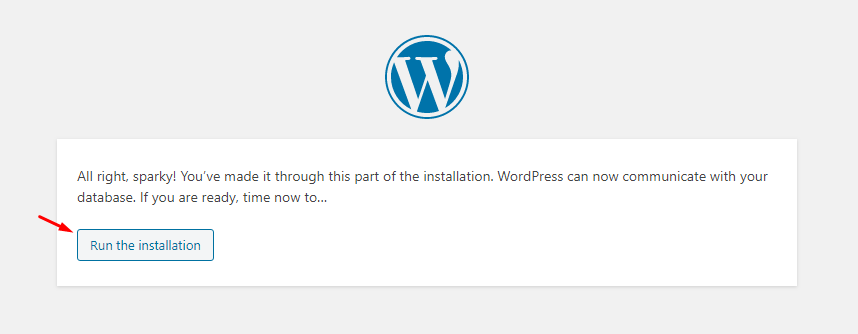
The next screen will confirm the successful database configuration Click ‘Run the installation’ to begin the WordPress installation process.
In the next screen, provide information about your website and set the username and password to access the WordPress dashboard.
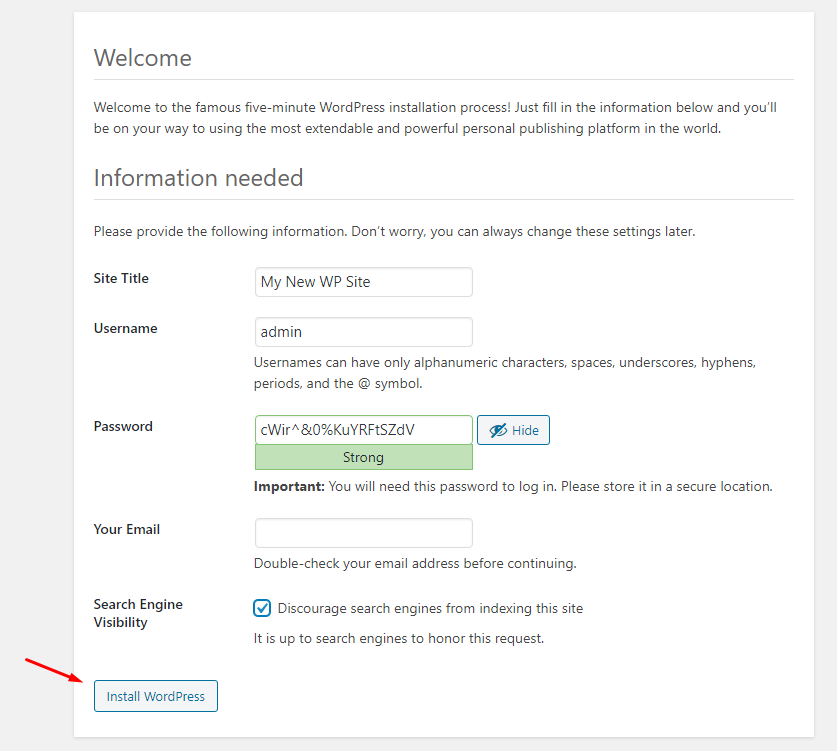
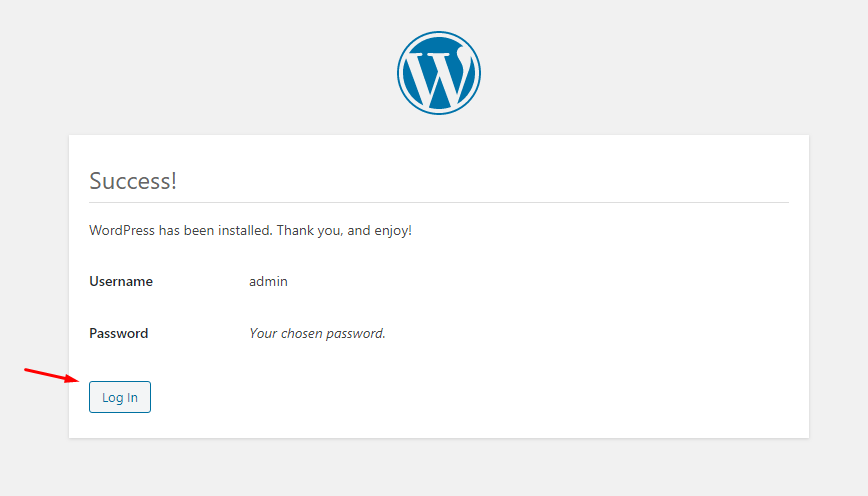
Once done, click the ‘Install WordPress’ button. This will show the success message and the button to launch the very well known WordPress dashboard login page.
That’s all you need to do to install WordPress locally on your Windows machine.
Install WordPress on Mac
If you are a Mac user, you can also use WordPress locally on your Mac. Just like Windows, you will need to set up a stack to run WordPress locally. Although the steps differ a bit, the overall process of using WordPress locally on Mac remains the same.
Step1: Download MAMP
In the first step, download MAMPwhich sets up a web server and database for the WordPress installation.
Go to the MAMP office website to download the setup for macOS.
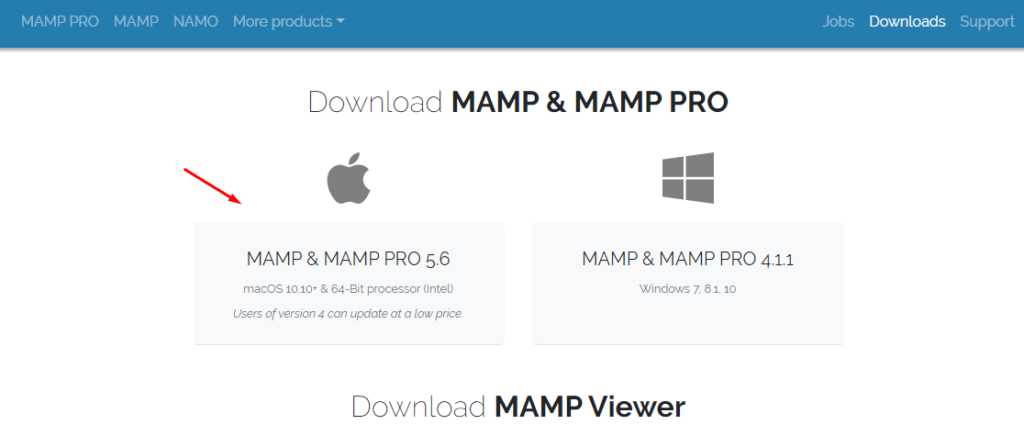
Once the download is finished, begin installing MAMPP by running the installation wizard. You may be asked to install the Pro version as well. This is not a mandatory requirement and you can start with the free version by clicking the grey folder.
Once installation finishes, head over to the MAMP controller and start the server.
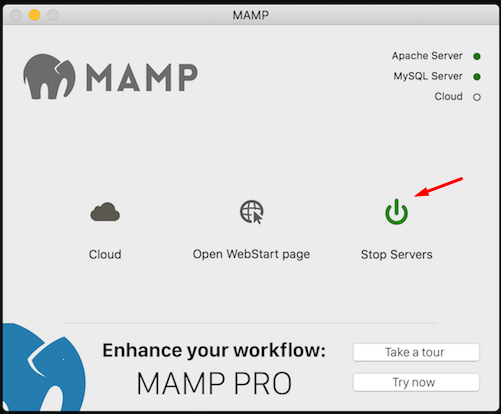
Once the server is up and running, click Open WebStart page to launch phpMyAdmin.
Step2: Install WordPress Locally for Mac
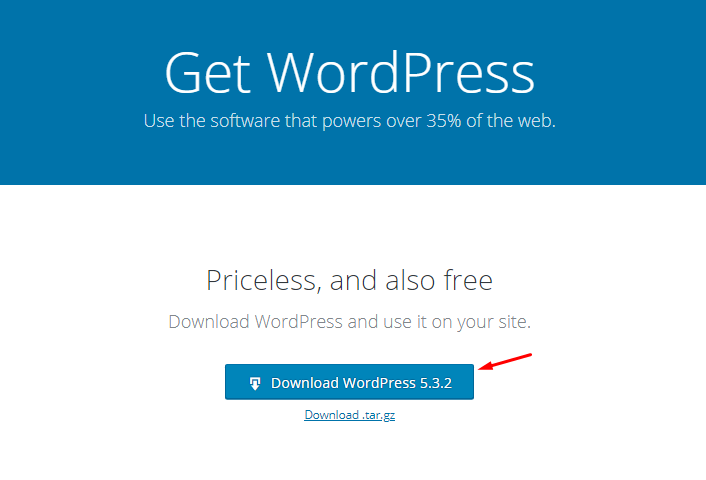
Mac users can download WordPress setup for Mac from the official website.
After downloading WordPress for Mac, unzip the downloaded file and place the folder inside the MAMP document root folder. You can rename this folder as the name of the WordPress site.
Now, create the database using the phpMyAdmin through the MAMP control panel. Fortunately, phpMyAdmin works the same as in Windows. Add the name of the database and head over to the wp-config.php file to add database credentials.
Now, run the WordPress installation wizard by visiting the link, http://localhost/sites

The rest of the steps remain the same as when installing WordPress locally on Windows.
Final Thoughts
In this guide, I explained how to install WordPress locally on Windows and Mac. Using WordPress locally comes in handy and there are numerous use cases where using WordPress locally on your computer adds a lot of value to your learning curve.
Frequently Asked Questions
Q. How to install WordPress on localhost?
Step 1: Download a Local Server Software.
Step 2: Install MAMP Server.
Step 3: Run MAMP on Your Computer.
Step 4: Create a Database.
Step 5: Download WordPress.
Step 6: Put WordPress in MAMP’s htdocs.
Step 7: Install WordPress on Localhost.
Q. How to install WordPress on mac?
Step 1: Download MAMP
Step 2: Install WordPress locally on mac